I mentioned in my last blog post that I’d experimented with using motion capture data as a way to quickly animate characters for a game jam in Unity. Seeing as I’m neither an artist or an animator, the thought of simply being able to apply a data file of “walking”, “jumping”, “shooting” etc. and watch the character do those actions in a life-like way is very appealing, compared to laboriously editing sprite sheets or tweaking animation keyframes.
Friends who know more about animation than me point out that motion capture is a tool designed to help animators, rather than a tool designed to replace animators, but for my prototypes I’d be quite happy to use fairly raw motion-captured animations – they’d certainly be better than anything I could draw.
I encountered a fair number of issues along the way, so here’s a summary of my what I learned:
Step One : Acquire some Mocap Data
If you want high-quality ready-to-use character animations for Unity, then Mixamo seems the de facto place to go. However, they’re not cheap, so I sought out some free alternatives:
- The Carnegie-Mellon Graphics Lab Motion Capture Database has a large range of motions which can be copied, modified, or redistributed without permission. The original raw data is captured as ASF/AMC format, which I have no idea how to use. Fortunately, there are several repackaged versions, such as this version in more common BioVision Hierarchy (BVH) format.
- Japanese site mocapdata.com, which claims to be “the world [sic] biggest state of the art motion capture library on the earth” has several hundred free animations in various categories licenced under a CC Attribution licence, together with some ludicrously expensive “premium” animations… (such as this animation pack, which costs $82,200!!!). Animations are often recorded by different actors, and in various file formats (FBX, BIP, C3D, BVH). Rather annoyingly, though, the rigs used in the FBX downloads don’t appear to be compatible with Unity’s MecAnim system, so I had to download either the BIP or BVH format and convert them instead (details below).
- http://hyperlearn.p.ht/category/adobe-flash/ has ~400 everyday/sports animations in BIP format. Must be downloaded individually through an annoyingly ad-laden site, and despite being described as “free”, it’s unclear what the licence for use of these files is.
- http://gfx-motion-capture.blogspot.co.uk/ has around 50 free mocap animations in either BIP, BVH, or FBX format.
- The Ohio State University computing centre motion capture lab has a range of common male and female motions in various formats.
Step Two : Cleanup and Convert to FBX
Mocap data can be stored using a number of different file formats – FBX, BVH, C3D, and BIP are the most common – and, if you want free data, you can’t afford to be picky – you just grab it in whatever format it is supplied. However, before you import into Unity, you’ll need to convert all your animation clips to FBX. You may also need to do some cleanup work (in terms of data quality, you typically get what you pay for, so if you’re using data of zero cost you can expect …)
The exact steps required will depend on what format your data came supplied in, and exactly how messed up it is, but here’s some steps I found useful:
Cleanup BVH files using BV Hacker
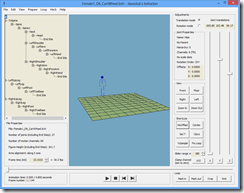
If your mocap data came in BVH format, the first thing you might want to do is use DaveDub’s free BV Hacker tool to load the file and play the animation it contains.
In addition to previewing the animation, you can also edit the translation and rotation of every joint in every frame using the simple sliders on the right hand side. There are also a handful of helpful functions to fix common problems:
- If your character appears to be “floating” above the ground surface (often with a white shadow underneath) for the entire animation, you can fix this with the No Offset button.
- If you want your character to remain on-the-spot for the entire animation (if, for example, you want an in-place walk cycle so you can manually control the actual locomotion of the character), you can check the Centre button and then Clamp translation in X, Y and Z axes.
- You can use the crop marks and the “Knit Ends” option to create a smooth loop animation.
- You can also resample the animation and adjust the frame rate.
- Be sure to take a note of the total number of animation frames shown in the timeline at the bottom – you’ll need this in the next step.
- Once you’re happy with how it looks in BV Hacker, save the BVH file.
 |
 |
Removing animation offset in BV Hacker
Convert BVH to FBX with Blender
There are probably other tools that can also do this conversion, but I used Blender.
- Load a new scene and delete all unnecessary objects from the scene (the lamp, camera, and cube) by right-clicking each to select and hitting delete.
- From the File menu, click Import –> Motion Capture (.bvh) and select the BVH file you just saved.
- You may well find that the model appears off-screen, in which case hit [Home] to focus the viewport on the newly imported animation. You should see a skeleton highlighted in orange, something like this:
- In the animation control at the bottom of the screen, set the final frame of the animation (shown in the End: field) to match the frame count reported in BV Hacker. (If you don’t do this, Blender will treat the animation as the default 250 frames long, which will either cut off frames at the end of the animation, or insert padding frames).
- You can also preview the animation and make any further changes using Blender’s edit mode.
- Once you’re happy, go to the File menu and select Export -> Autoodesk FBX (.fbx)
- In the Export FBX options panel on the left hand side, be sure that "Include Animation" is checked. For now, leave everything else as default (but you may need to revisit this section shortly if things don’t work right first time), and save the file.
Convert BIP to FBX with 3D Studio Max
3D Studio Max is a popular, high-end modelling package, and the BIP format is a proprietary file format used for Biped models created in 3DSMax. Sadly, it seems the only way you can load or convert BIP files to something else is to use 3D Studio itself – no other programs I’ve found can read or write to the format.
Fortunately, you can download a fully-functional 30-day trial of 3DStudio from the Autodesk website so, if you’ve gathered a set of mocap data in the BIP file format, you can use the trial software to convert them to FBX as follows:
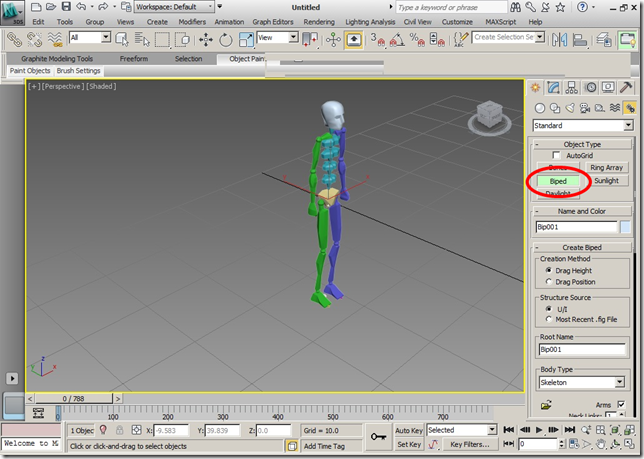
- From a blank 3DStudio scene, go to the panel on the right-hand side and select Create -> Systems –> Biped.
- You can adjust various options for the biped model, such as the number of bones in the spine, fingers, toes etc.
- Then click in the main viewport and drag to select the height of the created biped – a skeleton model will appear as shown below:
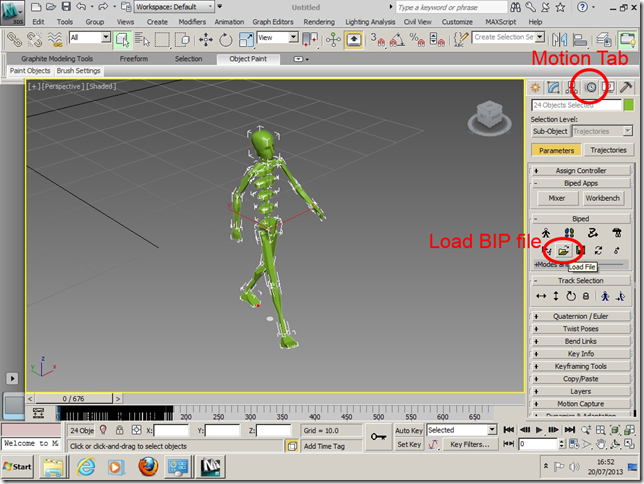
- Now, Click on the motion tab and, underneath the Biped options, click to Load File icon. In the File Picker dialog that appears, select the BIP motion file you want to load. You can choose either to map the animation to the biped rig you just created, or alternatively change the biped rig to match that in the animation – the choice is really up to you, and depends on how much fidelity of the original mocap you want to retain, compared to how well you want to create a skeleton that matches your intended target 3d model.
- You might find that loading the BIP file repositions the biped model in the scene, so click [Z] to refocus the viewport on the model.
- Use the timeline scrubber or animation controls at the bottom to run through the animation.
- If you’re happy, select File-> Export Selected, and select Autodesk FBX format. Make sure that “Animation” is checked in the FBX export options – you don’t need to include anything else:
Step Three : Import FBX to Unity
- Once you’ve converted your mocap file to FBX format using the steps above, drag it into your Unity project and select it in the Project explorer. In the Inspector panel, it’ll initially look like this:
- Click on the Rig tab in the inspector panel, select Animation Type: "Humanoid" and Avatar Definition: "Create from this model", then hit Apply. This will attempt to automatically create a Mecanim rig from the skeleton data in the FBX file.
- Click configure and check that the rig has been created correctly from the FBX file. The model should show all limbs as green. If so, apply the settings.
- Now, click on the animations tab. If you’re lucky, the animation preview should appear and you can click the play button to watch the default avatar perform the animation in the FBX file. Drag any other avatar onto the window and watch your action be performed by different characters – skeletons, robots, or anything bipedal!
Troubleshooting – Model Incorrectly Rotated?
- If you’re unlucky, you may find the animation in Unity has been rotated – facing sideways or down, as shown.
This is caused by the fact that some 3d programs use differing conventions for X,Y,and Z axes. I find the problem most commonly occurs (although, strangely, not always) in FBX models imported into Unity from Blender, so here’s how to fix that:
- Go back to Blender, and with the animation selected in Object mode (i.e. the entire skeleton highlighted in orange), hit [N] to bring up the properties window and expand the Tranform panel at the top.
- You need to set a value for the Rotation field – I find that most commonly setting Rotation X:90 degrees is what’s required, so that the character is facing the same direction as the z axis (blue), with y axis (green) going up, and x axis(red) to the character’s left, as shown in the below:
- IMPORTANT: Once you’ve set the rotation, you must then Ctrl-A in the main viewport and click to Apply the Rotation.
- Now, go to the File menu, and once again export the file to FBX. However, this time in the FBX Export Options, change the axes to match the rotated model – in this case that would be Z Forward, Y Up.
- Now, re-import the FBX file into Unity, re-rig the animation and try the preview again. Hopefully the avatar will be standing up, facing the camera. You may have to experiment with different rotation and axes settings before you get it right.
- Once you’ve built up a library of animation clips in Unity, you can then use the MecAnim Animator component to act as a state control mechanism to animate your character between them. But that’s for another post…


It was super post. I am working on mecanim animation system and when i am applying the FBX animation files on models, these are not taking it properly. As you suggested now i should use bvh or bip and convert it to FBX format.
Thank you very much for this helpful post.
This was the most informative and useful post I have ever read about “getting shit to work in unity”
Its a keeper…
Thanks for the awesome post, I’ve bookmarked it.
I also import a Free Mocap FBX to my Unity with Blender, but i think Blender ruins it. When I import the converted Mocap from Blender to Unity, the Mocap turns crazy. Perfect walking animation on Blender, crazy drunk bouncing animation on Unity.
Can you next write a bit about applying the mocap to other characters in Unity, please
Thanks, saved me 2 or 3 evenings at least 😉
I wonder, may be the guys at http://www.mocapdata.com/ mean yens instead of dollars and just forgot to convert the currency for english version? In other case their prices are insane indeed.
Excellent post – really useful and exactly what I’m looking for, but I’ve got a problem. I’ve followed your steps exactly and it works fine as far as importing the animation into Unity.
The problem is, after creating the avatar (which finds the bones without any issues) and then viewing the animation, the figure’s feet seem to be crossed over, as if the left foot is following the right foot’s transform and vice-versa, making the avatar walk with impossibly-crossed legs.
I’ve tried swapping the left foot/right foot in the avatar definition but that just breaks the avatar and the animation won’t play. Any ideas?
Hi!
Would be really great if you would share the files you converted to FBX, so that not each and every one of us reading your article has to through it all again, just like you did.
Cheers,
orrence.
1.) But then you’d have learned nothing – and if you wanted to fix mocap data from a different dataset, you wouldn’t know how. More useful to know the steps to follow than the end product.
2.) I can’t necessarily redistribute the files due to licencing of the source mocap data. But I’ve give you all the sources and processes I followed.
1.) Have you converted all of the mocap files included in the packages you mentioned above? I guess, no. And I would be surprised if all animations I need for my purposes were to be found in the ones you converted. So I would have to follow your instructions for those missing ones anyway. To be honest, I am looking for ways to achieve what I want with as little time and money possible, since I have a full time job and two little kids, a wife and a house to take care of. So programming a classic Point-And-Click-adventure (with Unity3d and the superb asset “Adventure Creator” from the Unity asset store) is a hobby for me on which I can spend only little time. Because we bought a house recently I cannot spend a lot of money on it, either. Otherwise I would go for Mixamo right away, because they have really good quality.
2.) I am pretty sure there would be no problem with the license if you don’t charge any money for it.
Please reconsider providing a couple of FBX animation files to an Adventure enthusiast …
Cheers,
orrence.
Pingback: Batch Conversion of BVH to FBX Motion Capture files | Alastair Aitchison
Great post! Saving it for reference as I am just starting out.
Pingback: Getting Started with Unity3D here is you 1 stop of shop of great resources - Microsoft UK Faculty Connection - Site Home - MSDN Blogs
Pingback: Mohamed Emam | Windows Game Development With Unity3D
This is a great tutorial, Dude!
Awesome post! Straight to the point and with resources to boot. Thanks!
You have mentioned about http://gfx-motion-capture.blogpspot.com in your post. I would like to point you out that it is now http://motcap.com
Hi, let me say that all this guide is really well explained, compliments!!!
I laughed when i saw the part where you say “if you are unlucky”
Well, as always, i’m the unlucky person… and among unlucky persons i’m the most unlucky ever
I’m always the strange, absurd single case that has everything going different from others!
Not only my avatar was laid, but all the movements when played in the preview are strange… forgive me, but… it seems that the avatar has an handicap
Not only that… if i play the scene… well… my character disappears!!!!!!!!!!
BAh….. 😦
I discovered my issue!! I had to change “version ASCII” when i export to FBX!! The preset was binary…
Pingback: Animação de esqueletos em 2D | Eduardo Veríssimo
Your post was very helpful for start using motion capture data in unity, i think mixamo is not best solution for animation ( unrealistic moves ) but auto rigging functionality save a lot of time, thanks.
Excellent presentation and content! Thank you for this post.
Thank you for this helpful article!
Btw. the link to http://accad.osu.edu/researchmain/research/motion_capture_lab/system_data.html doesn’t work anymore.
http://accad.osu.edu/researchmain/research/motion_lab/system_data.html it is now. 🙂
Hi ..
Thank you For the post. Quite useful and nice presentation.
http://www.gameyan.com
Pingback: Animation though Motion Capture | graphicsjourney
This is just perfect, thank you so much, i’m working on a soccer game and it’s so helpful!