I’m Back! Having Escaped the Room…

*Apologetically knocks on door* Ooooh, hello again. Remember me? Crikey – has it been that long?

I’ve been doing quite a lot over the last two years – new jobs, many new games and projects, and just general life – but it seems I’ve been somewhat absent in documenting and sharing it.  So, sorry about that. I’m going to try to get back into the habit, although in perhaps a slightly different direction than previously.

My current primary line of work has steered me somewhat away from my previous focus on spatial (c. 2005-2012) or videogames (c. 2011-2016), and I now find myself as a “playful technology” designer. That is, designing actual physical puzzles, games and playthings that use technology to delight, entertain, and amuse.

My latest project was to design an “Escape Room” game for the American Libraries’ Association International Games Week, and I’m creating a series of videos that describe the experience ony my (new) YouTube channel. I’ve just finished uploading the first video, which you can watch here:


In this first video, I describe the planning and overall design of the experience, which included discussing the following considerations:

Premises – How is the play space defined, making the “magic circle” in which players participate separate from the surrounding environment, allowing for passers-by to spectate, the possibility of multi-room and opening up new areas to advance game narrative. “Escape Room” games don’t have to involve escaping from a room!

Target Audience – What is “common knowledge” and interests of the target audience? What familiarity can you expect the players to have with certain technology? What degree of additional direction might players need to understand the affordances that certain items have?

Team size/dynamics – Have the team entered as a unit – do they already know each others’ skills and knowledge? Up to a certain point, additional players add to a team’s capability. However, past a certain threshold, the additional noise created by more players degrade the team’s ability. The total number of players affects the degree of parallelism of the game flow

Outcomes – Beyond simply being enjoyable, what experiences and outcomes should the players have? A Halloween game might thrill the players’ through fear, or a corporate escape event might be intended to build teamwork/communication skills. Outcomes can be worked into the game itself, or as a wider part of the experience – e.g. running a workshop after the game.

Theme and Narrative – The significance of the theme and narrative varies a lot between different games, but is always important to provide some thematic consistency and context to create an experience rather than simply a series of unconnected puzzles. Narrative also provides purpose and motivation – why do the players have to solve these puzzles? Why is there a time limit? What happens if they succeed/fail? When thinking of a theme, work with what you have – don’t fight against it! If your room takes place in an ancient building, don’t set your theme in space. If your game takes place in a library, set the narrative in a library!

Game Flow – Begin with a limited number of exposed puzzles so as not to overwhelm the players at the start. As the game progresses, let the game expand to expose more possible combinations. A series of linear steps can introduce a bottleneck – everything gets held up while waiting for the single element at the head of the puzzle to be solved. Having a greater degree of parallel puzzles allows more players to be simultaneously actively involved. Meta puzzles, such as removing multiple padlocks can act as motivator – rewarding achievements through the game, and also as an indicator of progress.

It’s a fairly theoretical discussion (and I do tend to ramble on a bit), but it’s intended to provide useful prompts for people who might be planning on building an escape room to consider. If you’re into more of the practical side of things, I plan to make two more videos in this series – the second will cover the design of many of the individual puzzle elements, while the third will cover the creation of the “hidden tech”-powered puzzles, involving Arduino and Unity, so I’ll let you know when those are ready.

As always, please let me know what you think, and any comments/suggestions welcome!

Posted in Game Dev | Tagged , , | Leave a comment

Guess Who Reloaded for the Rainbow Jam 2016

I recently enrolled to take part in the Rainbow Jam but, with somewhat of a lack of foresight, failed to realise I was going to be on holiday in France for most of the jam period, without either a computer or internet access. Determined not to be put off, I decided to try spending some of my time spent sipping vino in a deckchair in the Loire valley designing a paper and pen-based game instead.

A common game design exercise is to consider an existing game that is “broken” in some way, and propose some changes to the game mechanics that address those issues. The jam theme of “identity” made me immediately think of the children’s game Guess Who?, and it was this that gave me the inspiration for the jam.

guesswho1

I’m sure you’re familiar with the game: two players each have a card depicting a character chosen from an identical grid of characters. They take it in turns to ask each other questions to determine the identity of the other person’s card.

Why Is Guess Who broken?

Although I do recall fond memories of playing Guess Who? as a child, looking back at it now, the game is obviously broken in a number of different ways:

  • The dominant winning strategy is always the same – if on every turn you ask a question that distinguishes half of the remaining characters, you create a binary search which you are guaranteed to win in 5 questions (=Log₂ 24)
  • Because you’re trying to guess from a set of fictional characters, based only on a name and caricature of their face, the questions themselves are naturally limited to a crude (and often unkind) judgement of people’s appearance – “Do they have a big nose?”, “Are they old?”, “Are they ugly?”…
  • The creators have made a set of cards in which each obvious physical characteristic appears with a 5:19 ratio.In the set of 24 characters, there are 5 with hats, 5 with glasses, 5 with blue eyes, 5 with a bald head, for example. This is clever in that it makes it harder to formulate a question to produce the binary search strategy explained above. However, it does mean that there are only 5 women characters depicted compared to 19 men. (At least, we are led to assume such gender roles based on name and stereotypical presentation, yet Claire can be a man’s name, while Sam, Alex and Joe are commonly-used names by both men and women….). And, to avoid ambiguity, each characteristic must be apparent and polarised.
  • Although there have been various reprinted versions with updated art, to my knowledge, the characters above are the same used in every version of Guess Who?. Yet, looking at it, you’d think I’d used an image of the “White Supremacy” edition – there’s not any ethnic diversity whatsoever….

Fixing the Problem(s)

So I tried experimenting with a number of things to make the game better:

  • Coming up with a completely new set of characters, with a broader range of diversifying features: characters with a disability, different ethnicities and skin colours, and less binary divide between male/female genders, for example. This added more interest to the characters, but otherwise had little mechanic effect on the game – players’ questions could still only be based on purely physical appearance of the characters.
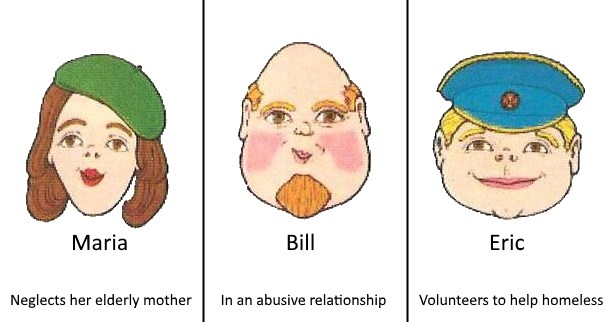
  • Adding short bios or descriptive facts to the cards enabled questions to be significantly more varied about the character’s personality, lifestyle, and identity (remember that’s the jam theme 🙂 than just their appearance alone. I started off with “age” and “profession” but then tried to be a little more adventurous. With some more time, I could probably have come up with a set of facts that fitted the 5:19 rule with regards to questions such as “Is this person trustworthy?”, “Does this person feel valued in their job?”. However, there would still be a fixed optimum strategy to eliminate the characters by asking appropriate questions to create the binary search each playthrough:

guesswho2

Then it struck me that the key problems with Guess Who? are all attributed to one fact – that it is played with a fixed set of fictional characters.

  • For the game to work, there must be unambiguous agreement between the players as to the answer to any question, yet that means there is no room for “shades of grey” – a character must either be a woman or a man, old or young, friendly or grumpy – and with only limited information able to be presented on the card, that necessarily means that the fictional characters must meet the stereotypes that I’ve been criticising.
  • The fact that it’s the same set of cards on every playthrough means that an optimum strategy can easily be developed (and remembered by a good player), reducing the skill and interest of repeat play.guesswho3


The solution : Guess Who Reloaded

Given the problem identified above, the solution then becomes remarkably easy – use a variation of the game in which there is a different set of real-life characters for each playthrough. And, with that, I present my game jam submission:

Players: 2

Equipment Required: Paper, pens

Set-up: Both players should agree on a list of 24 people with which they are all familiar – they could be mutual friends, family members, or celebrities, for example. To make the game more interesting, try to select a broad variety of people. Each player should write these names down on scraps of paper laid out, face up, in a grid in front of them. They then choose *one* of these people and write their name down on an additional scrap of paper, laid face down.This is the identity which the other player will try to guess.

Objective: The object of the game is to successfully guess the identity of the other player’s chosen person before they discover yours.

Gameplay: Players take it in turns to ask any question about the other player’s chosen person. Questions can only be answered with a single “Yes”/”No” response. Questions can take any form, from asking about the person’s physical appearance, to their history, personality, or any shared experience that they might have had with the player. Some examples might include:

  • “Does this person dye their hair?”
  • “Would you trust this person with your life?”
  • “Have you ever had a dream about this person?”
  • “Does this person have a tattoo?”
  • “Is this person embarrassing when drunk?”

After each response, the asking player should “eliminate” the candidates in front of them who do not match the response given by turning them face down. The winner is the first player to determine the identity of the other player’s chosen person.

The game is different on each playthrough, both due to the different selection of people and the players’ different personal experience and opinion of those people. If an optimal strategy exists, it is much harder to determine and execute due to the more subjective nature of characteristics present. And the game is made potentially more interesting and fun by drawing on shared, possibly asymmetric experiences of the players (“I didn’t know Rachel had a tattoo?!!!” etc.).

20160902_104916

Posted in Game Dev, Uncategorized | Tagged , , | Leave a comment

Bulk-renaming files

I recently found myself needing to rename around 100 files. The reason was that I had saved a series of video fragments from the middle of a much larger streaming video – so the fragment number of each filename was a sequence that started from about 1000, whereas the script I described in a previous post to join Adobe streaming fragments together needs fragments to be numbered sequentially from 1.

I considered writing a script to do it, but after a quick search of the internet came across a piece of software called Bulk Rename Utility which seemed to do the job really nicely.

The interface looks a bit scary at first, but actually it’s pretty logical when you get the hang of it. The bottom half of the screen shows various rules – numbered 1 to 14, which you can individually optionally enable. By combining them you can form quite complicated renaming rules – even more so if you conduct more than one pass over your filenames.

But the best feature is that you can click on any file in the file browser at the top half of the screen to preview instantly what the filename will be changed to after applying the current rules.  When you’re happy, just run it over all the selected files.

It’s not a task I need to do very often, so I just thought I’d note it here in the hope of reminding myself next time I need it, or in case anyone reading this ever needs to do the same.

Posted in General Development | Tagged | Leave a comment

Unity Shadertoys (a.k.a Converting GLSL shaders to Cg/HLSL)

If you’ve tried dabbling with shaders at all, you’ve probably come across ShaderToy – an online shader showcase with some pretty amazing examples of what’s possible in a few lines of shader code, inspired greatly by classic demoscene coding. Here’s just two examples:

seascape
Seascape” by TDM
elevated
Elevated” by iq

It’s an amazing resource, not only for inspiration but for learning how to create shaders, since every example comes with full source code which you can edit and immediately test online in your browser, alter parameters, supply different inputs etc.

The shaders exhibited on ShaderToy are exclusively written in GLSL, and run in your browser using WebGL. I thought it might be fun to keep my shader skills up to scratch by converting some of them to Cg / HLSL for use in Unity. I’m using Unity 5 but, to the best of my knowledge, this should work with any version of Unity.

GLSL –> HLSL conversion

It would probably be possible to write an automatic conversion tool to turn a GLSL shader into an HLSL shader, but I’m not aware of one. So I’ve been simply stepping through each line of the shader and replacing any GLSL-specific functions with the HLSL equivalent. Fortunately, many functions are the same, others have direct equivalents and, as a shader is typically less than 100 lines long, what sounds like a manual process only takes a few minutes in practice.

Microsoft have published a very useful reference guide here which details many of the general differences between GLSL and HLSL. Unity also have a useful page here. The following is a list of specific issues I’ve encountered when converting Shadertoy shaders to Unity:

  • Replace iGlobalTime shader input (“shader playback time in seconds”) with _Time.y
  • Replace iResolution.xy (“viewport resolution in pixels”) with _ScreenParams.xy
  • Replace vec2 types with float2, mat2 with float2x2 etc.
  • Replace vec3(1) shortcut constructors in which all elements have same value with explicit float3(1,1,1)
  • Replace Texture2D with Tex2D
  • Replace atan(x,y) with atan2(y,x) <- Note parameter ordering!
  • Replace mix() with lerp()
  • Replace *= with mul()
  • Remove third (bias) parameter from Texture2D lookups
  • mainImage(out vec4 fragColor, in vec2 fragCoord) is the fragment shader function, equivalent to float4 mainImage(float2 fragCoord : SV_POSITION) : SV_Target
  • UV coordinates in GLSL have 0 at the top and increase downwards, in HLSL 0 is at the bottom and increases upwards, so you may need to use uv.y = 1 – uv.y at some point.

Note that ShaderToys don’t have a vertex shader function – they are effectively full-screen pixel shaders which calculate the value at each UV coordinate in screenspace. As such, they are most suitable for use in a full-screen image effect (or, you can just apply them to a plane/quad if you want) in which the UVs range from 0-1.

But calculating pixel shaders for each pixel in a 1024×768 resolution (or higher) is *expensive*. One solution if you want to achieve anything like a game-playable framerate is to render the effect to a fixed-size rendertexture, and then scale that up to fill the screen. Here’s a simple generic script to do that:

using System;
using UnityEngine;

[ExecuteInEditMode]
public class ShaderToy : UnityStandardAssets.ImageEffects.ImageEffectBase
{

    public int horizontalResolution = 320;
    public int verticalResolution = 240;

    // Called by camera to apply image effect
    void OnRenderImage (RenderTexture source, RenderTexture destination)
    {
        // To draw the shader at full resolution, use:
        // Graphics.Blit (source, destination, material);

        // To draw the shader at scaled down resolution, use:
        RenderTexture scaled = RenderTexture.GetTemporary (horizontalResolution, verticalResolution);
        Graphics.Blit (source, scaled, material);
        Graphics.Blit (scaled, destination);
        RenderTexture.ReleaseTemporary (scaled);
    }
}

And finally, here’s an example of a ShaderToy shader converted to Unity. This one is “Bubbles” by Inigo Quiles:

// See https://www.shadertoy.com/view/4dl3zn
// GLSL -> HLSL reference: https://msdn.microsoft.com/en-GB/library/windows/apps/dn166865.aspx

Shader “Custom/Bubbles” {

    SubShader {
   
        Pass {
            CGPROGRAM

            #pragma vertex vert
            #pragma fragment frag
           
            struct v2f{
                float4 position : SV_POSITION;
            };
           
            v2f vert(float4 v:POSITION) : SV_POSITION {
                v2f o;
                o.position = mul (UNITY_MATRIX_MVP, v);
                return o;
            }

            fixed4 frag(v2f i) : SV_Target {
           
                float2 uv = -1.0 + 2.0*i.position.xy/ _ScreenParams.xy;
                uv.x *= _ScreenParams.x/ _ScreenParams.y ;
           
                // Background
                fixed4 outColour = fixed4(0.8+0.2*uv.y,0.8+0.2*uv.y,0.8+0.2*uv.y,1);
           
                // Bubbles
                for (int i = 0; i < 40; i++) {

                    // Bubble seeds
                    float pha =      sin(float(i)*546.13+1.0)*0.5 + 0.5;
                    float siz = pow( sin(float(i)*651.74+5.0)*0.5 + 0.5, 4.0 );
                    float pox =      sin(float(i)*321.55+4.1);

                    // Bubble size, position and color
                    float rad = 0.1 + 0.5*siz;
                    float2  pos = float2( pox, -1.0-rad + (2.0+2.0*rad)*fmod(pha+0.1*_Time.y*(0.2+0.8*siz),1.0));
                    float dis = length( uv – pos );
                    float3 col = lerp( float3(0.94,0.3,0.0), float3(0.1,0.4,0.8), 0.5+0.5*sin(float(i)*1.2+1.9));
                   
                    // Add a black outline around each bubble
                    col+= 8.0*smoothstep( rad*0.95, rad, dis );
           
                    // Render
                    float f = length(uv-pos)/rad;
                    f = sqrt(clamp(1.0-f*f,0.0,1.0));

                    outColour.rgb -= col.zyx *(1.0-smoothstep( rad*0.95, rad, dis )) * f;
                }
           
                // Vignetting   
                outColour *= sqrt(1.5-0.5*length(uv));

                return outColour;
            }

            ENDCG
        }
    }
}

Pretty, isn’t it?

bubbles

Posted in Game Dev | Tagged , , , , , | 5 Comments